How to Laser Cut Acrylic Like a Pro
Acrylic: a versatile, vibrant material that sparks creativity. From sleek, personalized gifts and eye-catching signage to intricate enclosures and stunning artistic pieces, laser cut acrylic offers a world of possibilities for makers and innovators. Its durability and clean finish make it a favorite, and with the precision of laser technology, your ideas can take shape with incredible detail.
If you've been wondering how to tap into the potential of laser cut acrylic, you're in the right place. Let's explore how you can transform acrylic sheets into stunning realities.
Can You Laser Cut Acrylic?
The short answer is a resounding yes! Laser cutting is an excellent and widely adopted method for shaping acrylic. The process involves a highly focused laser beam that precisely melts or evaporates the material along your designed path, resulting in clean cuts and often beautifully polished edges.
There are two main types of acrylic you might encounter:
- Cast Acrylic: Often preferred for engraving as it typically produces a frosty, contrasting mark. When cut, its edges can be flame-polished to a high sheen.
- Extruded Acrylic: Known for cutting very cleanly, also yielding a flame-polished edge. It can be slightly more prone to stress if not handled carefully after cutting.

A key thing to note, especially with diode lasers (common in many desktop machines), is how they interact with different acrylic types. Clear acrylic can be particularly challenging for visible-light diode lasers, as the light tends to pass through it. That's why, at Snapmaker, we provide clear guidance through our "Officially Tested Materials" list, specifying which types of acrylic, like "Dark Acrylic (Blue excluded)" and "Non-transparent Acrylic," are best suited for our laser modules. This ensures you get the best results every time.
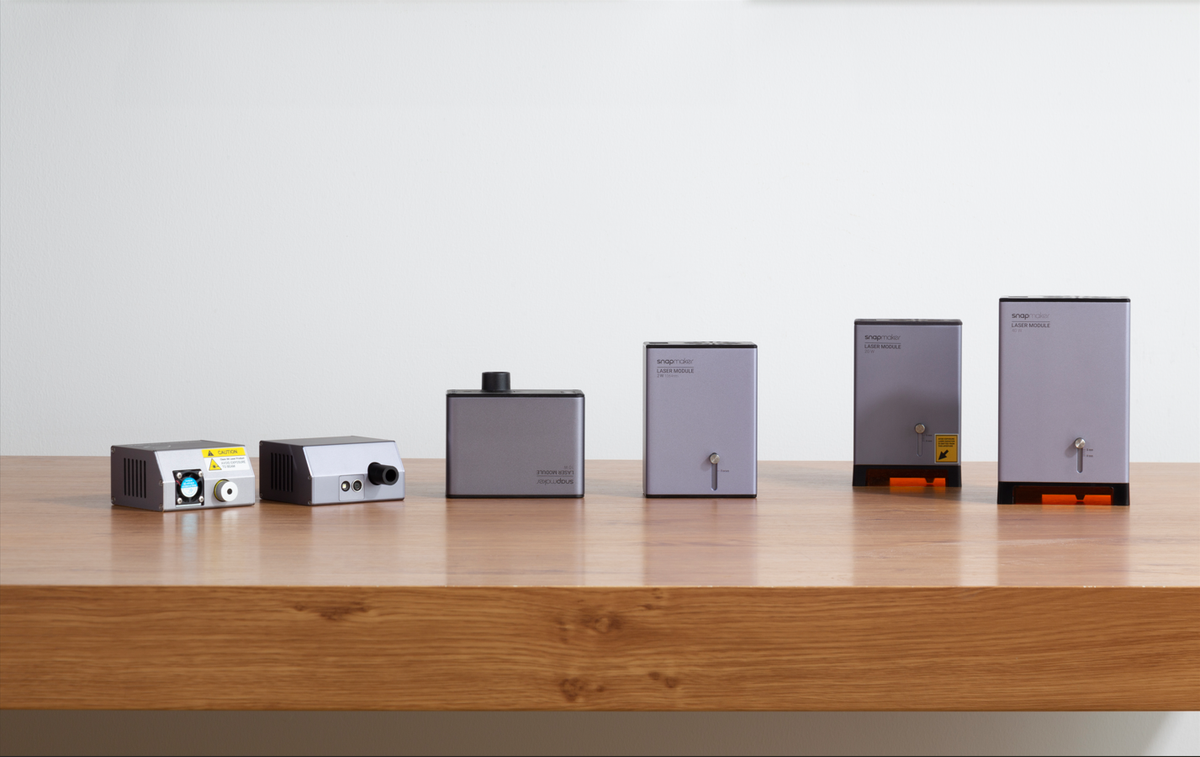
Choosing the Right Snapmaker Laser for Your Acrylic Projects
Understanding your Snapmaker's laser capabilities with different acrylics is key to project success.
Snapmaker 1064nm Infrared Laser Module: Ideal for those starting their laser journey or working with specific lighter materials.
- Cutting: Officially tested and capable of cutting "Non-transparent Acrylic." This makes it a great choice for certain opaque colored acrylics for smaller decorative pieces or inlays.
- Engraving: While its primary strength with acrylic is cutting non-transparent types, it also handles engraving on a variety of softer materials, showcasing its versatility.
Snapmaker 10W Laser Module: A significant power leap from the 1.6W, the 10W module opens up a broader range of possibilities.
- Engraving & Cutting: Officially tested for both engraving and cutting "Dark Acrylic (Blue excluded)."
- Its "ultra-fine laser focus" allows for incredibly detailed engraving work on these darker acrylics. The integrated "wind channel" also assists in blowing fumes away from the material surface, contributing to cleaner results.
Snapmaker 20W & 40W Laser Modules: These are our powerhouse modules, designed for more demanding acrylic projects and thicker materials.
- Engraving & Cutting: Like the 10W, these are officially tested for engraving and cutting "Dark Acrylic (Blue excluded)."
- The crucial advantage here is the integrated Smart Air Assist, which comes standard. This feature is a game-changer for acrylic, actively blowing a jet of air at the cutting point to significantly reduce flaming, prevent charring, and produce exceptionally clean, smooth edges.
- The increased power of the 20W and especially the 40W modules allows for cutting through thicker dark acrylics more efficiently or achieving faster processing times compared to the 10W.
So, Can a 10W Laser Cut Clear Acrylic?
This is a common question we see! Snapmaker 10W laser module (and similarly, the 20W and 40W diode laser modules) is optimized for "Dark Acrylic (Blue excluded)." It is not designed to cut clear acrylic. Most diode lasers struggle with clear materials because their visible light wavelength tends to pass right through without being absorbed. For cutting opaque acrylics, the 1.6W module is rated for "Non-transparent Acrylic," while the 10W, 20W, and 40W modules tackle "Dark Acrylic (Blue excluded)."
What Settings to Laser Cut Acrylic?
Achieving that perfect cut or engraving on acrylic involves a balance of settings. While specific parameters will vary based on the exact type of acrylic (cast vs. extruded, specific brand, precise color, and thickness), here are some general best practices for your Snapmaker:
- Power: Generally, higher power is needed for cutting, while engraving might use less.
- Speed: Slower speeds allow the laser more time to melt or vaporize the material cleanly, especially for thicker acrylics. Engraving often uses faster speeds.
- Passes: Thicker acrylic might require multiple passes at a moderate power setting rather than one slow pass at very high power, which can sometimes lead to overheating or melted edges.
- Air Assist: We can't stress this enough for acrylic. The Smart Air Assist on the Snapmaker 20W & 40W Laser Modules is invaluable. It dramatically improves cut quality by minimizing flare-ups and keeping the cut edge clean. The 10W Laser Module's "wind channel" also provides beneficial airflow.
- Focus: Accurate laser focus is critical. Utilize Snapmaker's easy-to-use focusing features, like the auto-focus on the 10W Laser Module or the convenient focus lever on other modules.
Material Testing is Non-Negotiable: Every sheet of acrylic can be slightly different. Always, always perform a test cut or engrave on a small, inconspicuous piece of the exact material you plan to use before committing to your full design. This allows you to dial in the power, speed, and number of passes perfectly.
Should You Remove Paper/Film from Acrylic Before Laser Cutting?
Acrylic sheets almost always come with a protective paper or plastic film on both sides.
Top Side (where the laser hits first): Usually YES, remove it.
The protective film can melt, cause more flaming than the acrylic itself, and leave a sticky, messy residue on the cut edge or even on the surface of your project. Removing it from the top allows for direct, clean laser contact with the acrylic.
Bottom Side: It Depends.
- Leaving it on: Some makers prefer to leave the film on the bottom side. This can sometimes help reduce "flashback" marks – small blemishes caused by the laser reflecting off your machine's bed (especially if you're not using a honeycomb bed or if the material isn't sufficiently elevated).
- Removing it: However, the bottom film can also melt and adhere to the bottom edge of your cut, requiring extra cleanup.
- Our Recommendation: For the cleanest results, especially when using Snapmaker's Air Assist and a suitable laser bed, we often recommend removing the film from both sides. However, testing is key. Try a small cut with the bottom film on and one with it off to see which gives you the best result for your specific setup and acrylic type.

When working with "Dark Acrylic" or "Non-transparent Acrylic," the color and opacity of the material itself help with laser energy absorption, but the protective film is still a separate factor to consider for cleanliness. Proper material prep is a small step that makes a big difference in the final output from your Snapmaker laser.
Pro Tips for Stunning Laser Cut Acrylic
Ready to elevate your acrylic creations? Here are a few more tips:
- Ventilation is Key: Acrylic, when lasered, produces fumes. Always operate your Snapmaker laser, especially when working with plastics like acrylic, within the Snapmaker Enclosure and ensure good ventilation in your workspace.
- Cleaning Edges: Even with perfect settings, you might sometimes have a slight residue. Isopropyl alcohol can often clean up edges, but always test it on a scrap piece first as it can sometimes cause crazing (tiny cracks) on certain acrylics. A microfiber cloth can also be good for gentle buffing.
- Design Considerations:
- Kerf: The laser removes a tiny bit of material as it cuts. This width is called the "kerf." Account for it in your designs if you're making parts that need to fit together snugly. You can measure the kerf by cutting a small square and comparing its actual size to your design.
- Small Details & Sharp Corners: Very intricate details or sharp internal corners might require slightly slower speeds or careful design to ensure they cut cleanly without melting too much.
- Safety First, Always!
- As mentioned, always operate your laser within the Snapmaker Enclosure. This not only helps with fume management but also acts as a physical barrier.
- Always utilize the Laser Safety Goggles provided by Snapmaker for everyone in the vicinity during operation.
- Our laser modules incorporate safety features like tilt detection on the 1064nm Infrared Laser Module or gyro sensors on the 10W Laser Module, but user vigilance is paramount.
Conclusion
Laser cutting acrylic opens up a universe of creative endeavors, and with your Snapmaker, the journey from digital design to tangible art is more accessible and precise than ever. By understanding your material, choosing the right Snapmaker laser module based on our "Officially Tested Materials," and following best practices, you're well on your way to producing stunning results.