Hollow 3D Printing: Save Material & Avoid Pillowing

Let’s be honest: large-scale 3D printing has a "sticker shock" problem.
You download a file for a life-size cosplay helmet or a massive architectural bust, load it into your slicer, and stare at the estimates. 800 grams of filament? 48 hours of print time? For a hobbyist project, that’s a heavy investment in both time and plastic.
Most of that material isn't even visible; it’s buried inside the model as "infill"—the internal lattice structure used to support the roof of your print.
This is where hollow 3D printing becomes a critical skill. It is the single most effective strategy for drastically reducing material costs and print times. However, simply deleting the infill isn't a magic button. Without the right technique—and the right hardware—hollowing out a model often leads to fragile walls and the dreaded "pillowing" effect on top surfaces.
Here is how to master the art of the hollow print.
What Is Hollowing in 3D Printing?
In the context of FDM (Fused Deposition Modeling), "hollowing" doesn't necessarily mean modifying the 3D mesh itself. Instead, it is typically a slicing strategy.
When we talk about printing a hollow object, we are effectively setting the infill density to 0%.
By doing this, you instruct the printer to create only the shells (the outer walls) and the top/bottom layers, leaving the interior volume completely empty air. This differs from "Vase Mode," which is a continuous spiral for single-walled objects. True hollow printing retains the ability to have thick, durable walls—just without the internal honeycomb.
Why Should You Print Hollow Objects?

Beyond just being "cheaper," printing hollow offers specific mechanical and logistical advantages:
- Drastic Material Savings: For a volumetric model like a statue, infill can account for 40% to 60% of the total material. Removing it cuts your cost per part significantly.
- Reduced Print Time: The print head no longer needs to move back and forth to fill the interior. On large prints, this can shave off hours—or even days.
- Lightweight Utility: For wearable props (like helmets) or drone parts, weight is the enemy. Hollow prints provide the external geometry you need without the internal mass.
- Translucency: If you are printing with clear PETG or PLA for a lamp shade, infill patterns create ugly internal shadows. A hollow print allows for clean, uniform light diffusion.
The Major Challenge: The "Pillowing" Effect
If hollow printing is so efficient, why doesn't everyone use it by default?
The answer lies in physics. FDM printers work by depositing molten plastic on top of a previous layer. When you print with 0% infill, the printer eventually has to print the "roof" (the top solid layers) of your model.
Without infill, the printer is essentially trying to bridge molten plastic across thin air.
On small models, the machine might get away with it. But on larger surface areas, gravity takes over. The first few top layers will sag, droop, and break, creating bumpy, hole-ridden surfaces. This defect is known as "pillowing."
Standard workarounds include:
- Increasing Top Layers: Trying to cover the mess with more plastic (which wastes material).
- Aggressive Part Cooling: Blasting the bridging layers with fans (which can cause layer adhesion issues).
However, there is a more elegant, industrial-grade solution.
The Ultimate Fix: Multi-Toolhead Support Interfaces
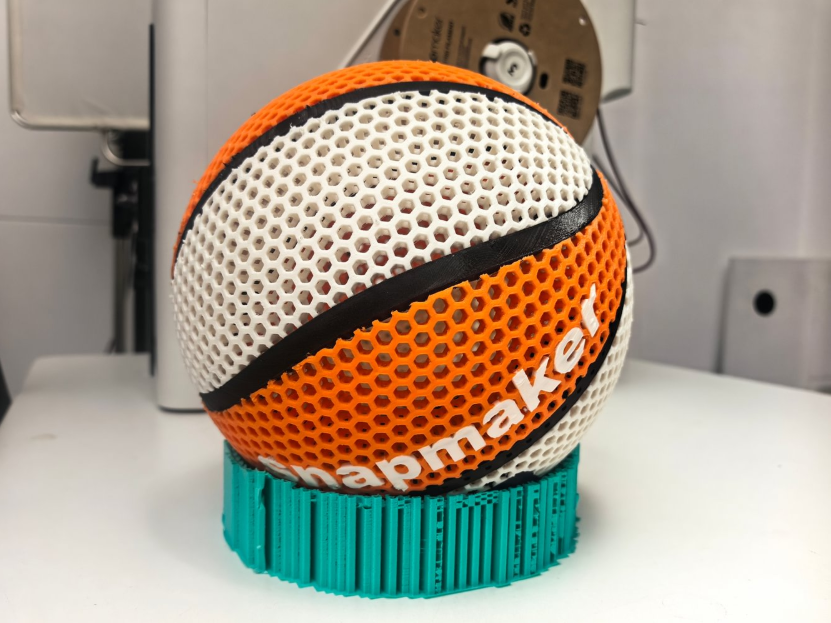
3D Printed Football, Tennis, Rugby, Basketball
The most professional way to print a perfect hollow object is to use a support interface.
The concept is simple: you don't need to fill the entire model to support the roof. You only need a "temporary floor" right before the top layers begin.
The Limitation of Standard Printers
On a standard single-extruder printer, doing this is a nightmare. Using the same material for the support interface means it fuses to the roof, making it impossible to remove from the inside of a hollow object.
Even on multi-color systems (like those using filament splicers or AMS units), printing a dedicated interface layer is inefficient. The printer has to purge material for every single layer of that interface, creating a waste tower that negates your material savings.
The Tool Changer Advantage
This is where Tool Changer technology—seen in machines like the Snapmaker U1—changes the calculus for hollow printing.
Unlike standard dual-extruders (IDEX), which only offer two heads, a true Tool Changer like the U1 features four independent toolheads. This hardware architecture solves the hollow printing dilemma through dedicated material handling:
- Toolhead 1 (Main Material): Prints the outer shells of your model (e.g., in standard PLA).
- Toolhead 2 (Support Material): Is loaded with a dedicated "breakaway" material (like PETG for PLA prints, or specialized support filament).
Because the machine physically swaps toolheads rather than purging filament, it can efficiently print a dense support interface only at the very top of the hollow cavity.
The printer builds a hollow shell, switches to the second toolhead to lay down a perfect, non-stick foundation for the roof, then switches back to finish the top layers. Once the print is complete, you can break away the support interface through a drain hole, leaving a lightweight, hollow part with a flawless top-surface finish.
With a 4-head system, you aren't forced to choose between aesthetics and functionality. You could even print a multi-colored hollow model (using Heads 1, 2, and 3) and still reserve Head 4 for that critical support interface—a feat impossible on standard IDEX machines.
Two Practical Tips for Specific Hollow Shapes
If you are ready to try hollow printing, here are a few geometry-specific tips to ensure success:
Tip 1. 3D Printing a Hollow Sphere
Spheres are notoriously difficult because they have a tiny contact patch with the build plate.
- Adhesion: Always use a "Brim" or "Raft" in your slicer settings to anchor the small bottom point of the sphere.
- Drain Holes: If you are using the support interface method mentioned above, ensure you design a small hole at the bottom (or include it in your CAD design) so you can shake out the support debris later.
Tip 2. 3D Printing Hollow Tubes
For cylindrical objects, the challenge is wall strength.
- Wall Line Count: Don't rely on a single wall (perimeter). For a hollow tube to be functional and not feel like a crushed soda can, aim for at least 3 to 4 wall lines.
- Concentricity: High-speed printing can sometimes distort round shapes. This is where the rigid motion system of a CoreXY machine becomes valuable to maintain a perfect circle throughout the Z-axis.
Conclusion
Hollow 3D printing is about finding the balance between efficiency and structural integrity. For simple decorative parts, dialing your infill to 0% might be enough. But for complex, large-scale models where surface quality matters, relying on advanced hardware capabilities like independent tool changers allows you to cheat the physics of FDM printing.
By using the right support strategies, you can stop printing "air" and start printing smarter.