3D Printer Layer Height Guide: Master Speed, Quality, and Strength
Imagine this: you spend hours perfecting a 3D model. It looks flawless on your screen, every curve just right. You hit print, wait patiently, and when the part finally cools, it’s… rough. Maybe even fragile. The problem usually isn’t your filament or printer. It’s the layer height, how thick each printed layer is. That tiny number changes how smooth, strong, and fast your print comes out.
Understanding Layer Height: The Basics
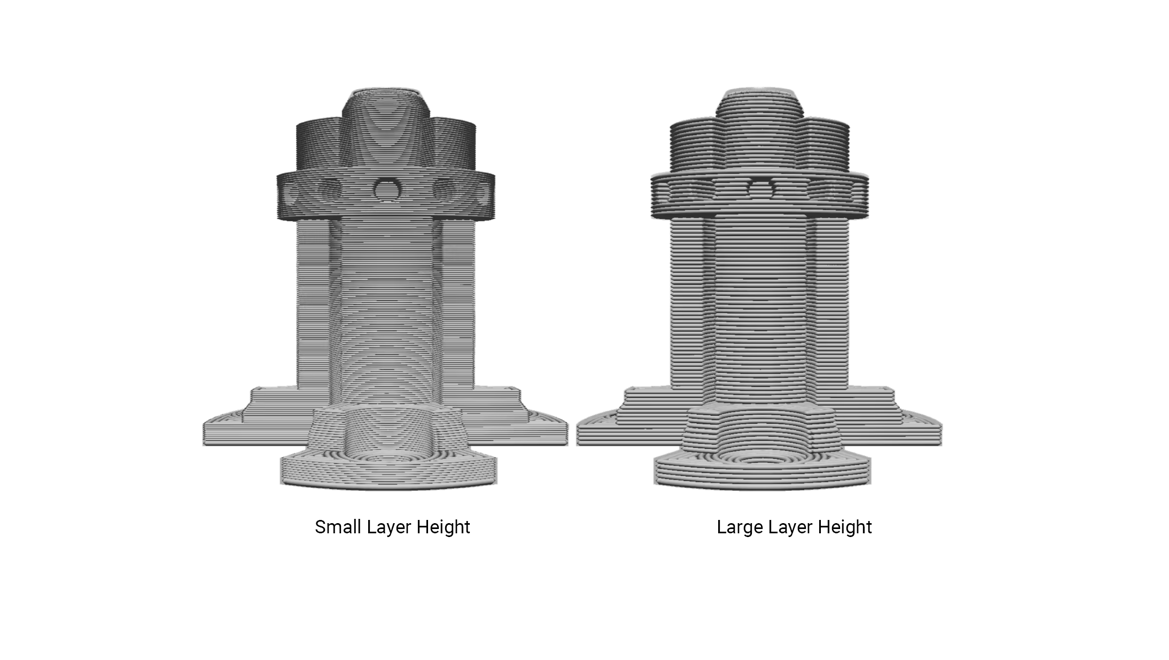
Layer height defines your print’s Z-axis resolution. Smaller layer heights improve surface finish and detail, while larger ones reduce print time but leave visible lines.
What Is Layer Height and Why Does It Matter
Layer height is the “thickness” of each printed slice; the smaller it is, the more layers your print needs. That’s why the shortest layer in height produces smoother results, but also takes much longer. Larger heights save time but show visible ridges, the classic “stair-stepping” look.
One thing layer height doesn’t affect is XY precision. That’s all about the nozzle diameter and motion accuracy. Layer height only changes the resolution in the vertical (Z) direction.
The Typical Range for FDM Printers
Most FDM printers work with 0.1–0.4 mm layers. 0.2 mm is a good balance of speed and detail.
The smallest layer height for .4 nozzles makes surfaces very smooth, but takes longer to print. Bigger layers print faster, but details are not as clear. Small layers are great for miniatures or display models.
FDM vs Other Technologies
Compared to FDM, resin-based technologies go much finer. SLA prints tiny layers (0.025–0.1 mm); FDM uses bigger ones (0.05–0.4 mm). Layer height matters more for FDM. That’s where the real tuning happens.
Nozzle Diameter and Layer Height Rules
Your nozzle diameter sets the hard physical limits for how thin or thick you can print. Every layer height setting must stay within a safe extrusion range to avoid under- or over-extrusion.
Keep 0.4 nozzle layer height at 25–80% of your nozzle, 0.10–0.32 mm for a max layer height for.4 nozzle; thinner works but is slower and may clog.
The Magic Number Principle (Z-Axis Optimization)
Every printer’s Z-axis moves in tiny increments defined by its lead screw and stepper motor. Layer heights that don’t align with those steps can cause rounding errors or visible banding.
That’s why the best results come from using layer heights that match Z-axis “magic numbers.” For many printers, those are 0.16 mm, 0.20 mm, 0.24 mm, and so on.
Snapmaker tip: The Snapmaker U1 likes 0.04 mm steps. Using heights like 0.08, 0.12, 0.16, or 0.24 mm keeps prints smooth and reduces Z-banding.
Layer Height and Strength: The Science Behind Durability

Layer height doesn’t just change how your print looks; it also affects how tough it is.
The Common Misconception
Many assume that thicker layers make a print stronger. After all, more material per layer should mean more strength. Actually, not always. Smaller layer heights often produce tighter bonds between layers, creating better overall strength.
What Studies Show
Tests on materials like ABS show something surprising: prints made at 0.2 mm layer height tend to have higher tensile strength than those printed at 0.8 mm. The reason is thermal.
Practical Guidelines
If you’re printing mechanical parts that need durability, aim for 0.15–0.25 mm. That’s where you get the best balance of bonding and efficiency. And always consider print orientation, try to position the part so that stress doesn’t pull directly along the layer lines.
Choosing the Right Layer Height for Your Print
There’s no one-size-fits-all setting. The best 3D printer layer height depends on your purpose and your filament type.
By Application
- High detail models: 0.10–0.15 mm (Fine detail, long print time)
- Everyday prints: 0.20–0.25 mm (Balanced speed and quality)
- Fast prototypes: 0.30–0.40 mm (Speed, less detail)
By Filament Type (0.4 mm Nozzle)
Each filament behaves differently with heat. ABS, for instance, warps easily and benefits from smaller layers that stick better. PLA can handle thicker layers since it cools quickly and maintains its shape.
For large objects where surface finish doesn’t matter, push the height higher. For small or decorative models, go fine. Once you understand how materials and goals interact, you’ll start to see patterns in what works best.
Conclusion: Master Your Print Resolution
Most of the time, the ideal range is 0.20–0.25 mm, fast enough for practical prints, yet detailed enough to look sharp. Remember the rule for a 0.4 mm nozzle: safe range 0.10–0.32 mm.
Don’t assume thinner is always better. Smaller heights can waste time and even weaken your part if not tuned well. The secret lies in balance, between aesthetics, speed, and function.
Modern slicers now offer tools like Adaptive Layer Height, automatically changing thickness where needed. Combine that with precise hardware such as the Snapmaker U1, and you’ll find yourself printing both fast and beautifully.
Experiment a little. Try different layer heights on your next project—or even try smoothing your prints post-process—watch how it changes the result, and note what feels right for your setup.
Once you understand how to control layer height, you stop printing by trial and error and start printing with precision.