Guide to Perfect 3D Printer Bed Leveling
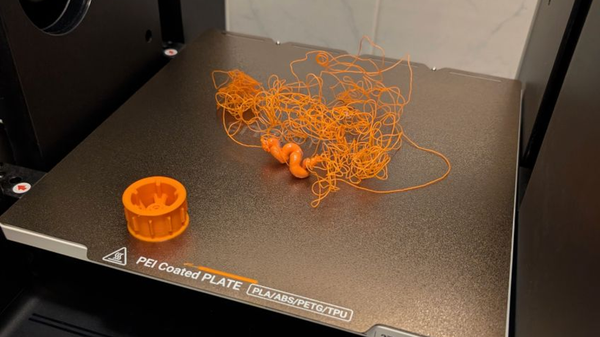
Of all the skills a 3D printing enthusiast can learn, mastering bed leveling provides the most significant payoff. It’s the single most important process for achieving high-quality prints and the main solution for a whole host of common print failures. An unlevel bed is often the root cause of poor adhesion, warping, and inaccurate first layers that can doom a print right from the start.
This guide provides a definitive, step-by-step method for achieving a perfectly calibrated print bed. We’ll cover the essential prep work, the nuances of manual and automatic leveling, and the advanced concepts that separate beginners from experts.
Step 1: Prep for an Accurate Level
Before you begin calibrating, running through these preparatory steps is critical. Skipping them will only undermine the accuracy of your results.
A. Thoroughly Clean the Build Surface Your build plate must be completely free of any grease, oils from your fingertips, dust, or old filament residue. Simply put, molten plastic won't stick properly to a dirty surface. Be sure to wipe the entire plate down with a high-concentration Isopropyl Alcohol (IPA) and a clean, lint-free microfiber cloth.
B. Set a Consistent Mechanical Starting Point For printers with manual adjustment springs, it's crucial to get rid of any slack in the leveling mechanism. A widely used best practice is to first tighten all the bed leveling knobs until the springs are moderately compressed—don't over tighten them. From this snug position, loosen each knob by two full, identical turns. This ensures all the springs are under active tension and gives you a consistent, even starting point for your adjustments.
C. Always Level at Operating Temperature This is a non-negotiable rule dictated by basic physics. The metal components in your printer, especially the aluminum heat bed and the nozzle, expand when they get hot. This thermal expansion, while microscopic, significantly alters the distance between the nozzle and the bed. If you calibrate your machine while it's cold, those precise settings will be incorrect once the printer reaches its target temperature.
Action: Before you move on, preheat both your nozzle and your bed to the exact temperatures you plan to use for your chosen filament (for example, with PLA, that’s typically 200°C for the nozzle and 60°C for the bed).
Step 2: Manual Bed Leveling Process
Manual leveling is a fundamental skill. It takes a little practice, but the hands-on feedback you get provides an excellent understanding of your machine.
The Tools:
- Standard Paper: A simple piece of office paper is the most common tool to start with.
- Feeler Gauge: For more precise and repeatable measurements, a metal feeler gauge is the better choice. A thickness of 0.1mm is a perfect starting point, as this is a typical height for an initial layer.
The Step-by-Step Calibration Method:
- Home the Axis: First, use your printer’s on-screen controls to run an "Auto Home" sequence. This sends the print head to its origin point.
- Disable Stepper Motors: In the printer's menu, find the option to "Disable Steppers" or "Motors Off." This will let you gently move the print head and bed by hand without any resistance.
- Position the Nozzle: Gently guide the nozzle so that it’s positioned directly over the first leveling screw.
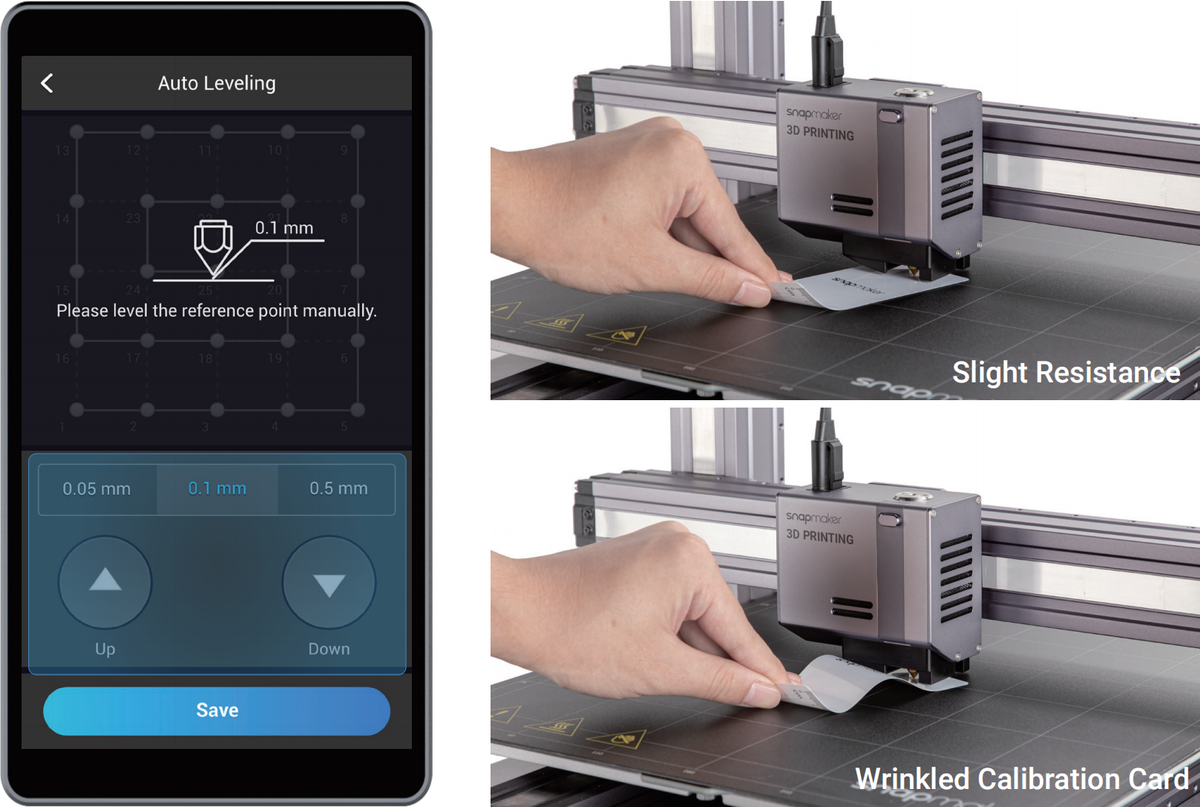
- Measure the Gap: Slide your piece of paper or 0.1mm feeler gauge into the space between the nozzle tip and the build plate.
- Adjust and Feel the Drag: Now, turn the adjustment knob under that corner. As you move the paper or gauge back and forth, you want to feel a distinct but light friction. It shouldn't slide completely freely, but it also shouldn't get stuck or buckle. You're aiming for a gentle, consistent scraping sensation. Getting a feel for this is the most important part of the process.
- Repeat for All Points: Repeat this exact process for the other three corners. On many printers, it’s also a good idea to check a fifth point in the very center of the bed.
- Iterate for Precision: Here's a crucial tip: adjusting one corner will slightly affect the others. You must repeat the entire multi-point process at least twice. Your second pass will require much smaller adjustments. This iterative process is the key to achieving a truly level plane.
Step 3: Verifying with a Test Print
The paper test gets you very close, but the definitive proof is seeing that first layer of plastic go down.
A. Find a Bed Leveling Test Model Search on a platform like Printables or Thingiverse for a "bed level test." These models are designed to print a large, single-layer pattern across the bed, which makes it easy to spot any leveling issues.
B. Analyze the First Layer "Squish" As the test model prints, watch the lines of filament closely. This visual feedback, often called the "squish," tells you everything you need to know.
- Perfect Level: The lines of filament are slightly flattened and perfectly fused together. The surface is smooth and uniform with no gaps between lines. When you remove the print, the bottom should feel like a single, solid sheet.
- Nozzle is Too High: The extruded lines will look rounded, almost like spaghetti, and won't merge. The print will be fragile and will probably have terrible adhesion to the bed, likely peeling off mid-print.
- Nozzle is Too Low: The filament will be squashed excessively flat, sometimes appearing almost transparent. You might see noticeable ridges form between the lines as the excess plastic gets forced outwards. In extreme cases, you might even hear a clicking or thumping sound from the extruder motor as it struggles to push filament through the tiny gap. This can damage both your nozzle and the surface of your build plate.
Step 4: Using Z-Offset for Fine-Tuning
Understanding the difference between leveling and Z-offset is key for more advanced control.
- Bed Leveling (Tramming): This process adjusts the tilt of the bed itself to make it physically parallel to the printer's gantry. You do this before you start a print.
- Z-Offset: This is a software setting that applies a tiny global vertical shift to the nozzle's starting position. You use this during the first layer of an actual print (as a "live adjustment") to perfect the "squish" without having to re-level all the corners. So, if your test print looks just a hair too high everywhere, you would apply a small negative Z-offset (like -0.02mm) to move the nozzle slightly closer to the bed.
Step 5: Understanding Automatic Bed Leveling (ABL)
ABL is a powerful feature that automates much of the fine-tuning process.

A. How ABL Works ABL systems use a sensor to probe the bed in a grid pattern, measuring the precise height at multiple points. This creates a detailed digital topographical map, or "mesh," of the build surface. When you start a print, the printer's firmware uses this mesh to make continuous micro-adjustments to the Z-axis, moving the nozzle up and down to follow the exact contours of the bed.
There are two common types of probes:
- Physical Touch Probes (like a BLTouch): A small pin extends and physically touches the bed at each point to take a reading.
- Non-Contact Inductive/Capacitive Probes: These sensors detect the proximity of the metal build plate without ever touching it.
B. The Role of G-Code For advanced users who work directly with printer code, the G29 command is what kicks off the ABL probing sequence. However, most modern printers with a touchscreen have integrated this into a simple, user-friendly button.
C. ABL is a Compensator, Not a Replacement for a Good Level It's a common misconception that ABL lets you completely forget about manual leveling. That's not quite true. ABL is designed to compensate for minor surface imperfections or slight warping—not a severely tilted bed. A well-leveled bed to start with will always give you the best results.
D. A Premium ABL System in Practice You can see the full potential of ABL in high-end systems. For example, the Snapmaker Artisan 3-in-1 3D printer uses an advanced inductive sensor to perform a 49-point leveling scan. This high-density grid creates an incredibly detailed surface map, allowing the firmware to compensate with extreme precision. This level of automation virtually eliminates the need for manual tweaking after the initial setup, ensuring a perfect first layer every time and letting the user focus on creativity rather than constant calibration.
The Bottom Line
Getting that perfect first layer isn't black magic—it's a process you can learn and repeat. If you walk away with anything from this guide, let it be these key ideas:
- A level, clean, and hot bed is the absolute foundation for every successful print. Skipping any of these prep steps is the number one reason first layers fail.
- Trust your tools, but always verify with your eyes. The paper or feeler gauge test gets you close, but a single-layer test print is the only way to see what's really going on. Your eyes are your best calibration tool.
- Use the right tool for the right job. The leveling knobs fix the bed's tilt. The Z-offset setting is for fine-tuning the overall distance while a print is live. Knowing that difference is the key to fixing problems efficiently.
- Think of automation as a tool for perfection, not for ignoring problems. Automatic Bed Leveling (ABL) is a fantastic technology that can take a good setup and make it nearly flawless, but it won't fix a severely tilted or poorly prepped build plate.
Master these concepts, and you'll spend a lot less time troubleshooting frustrating prints and a lot more time creating amazing things.